Showing posts with label crafts. Show all posts

Sunday, September 26, 2010

Harvest Houses

We made harvest houses today in celebration of the Autumnal Equinox.  Who said gingerbread houses were only for Christmas?  I started by making this gingerbread cookie recipe. While the dough was chilling I drafted a simple house template out of cardstock.  Here is one I found online if you just want to print it out and use it.  Using the cardstock template cut out two of each piece. 


Carefully place the house pieces on an ungreased cookie sheet and bake at 350 degrees until lightly brown around the edges...11-15 minutes. 


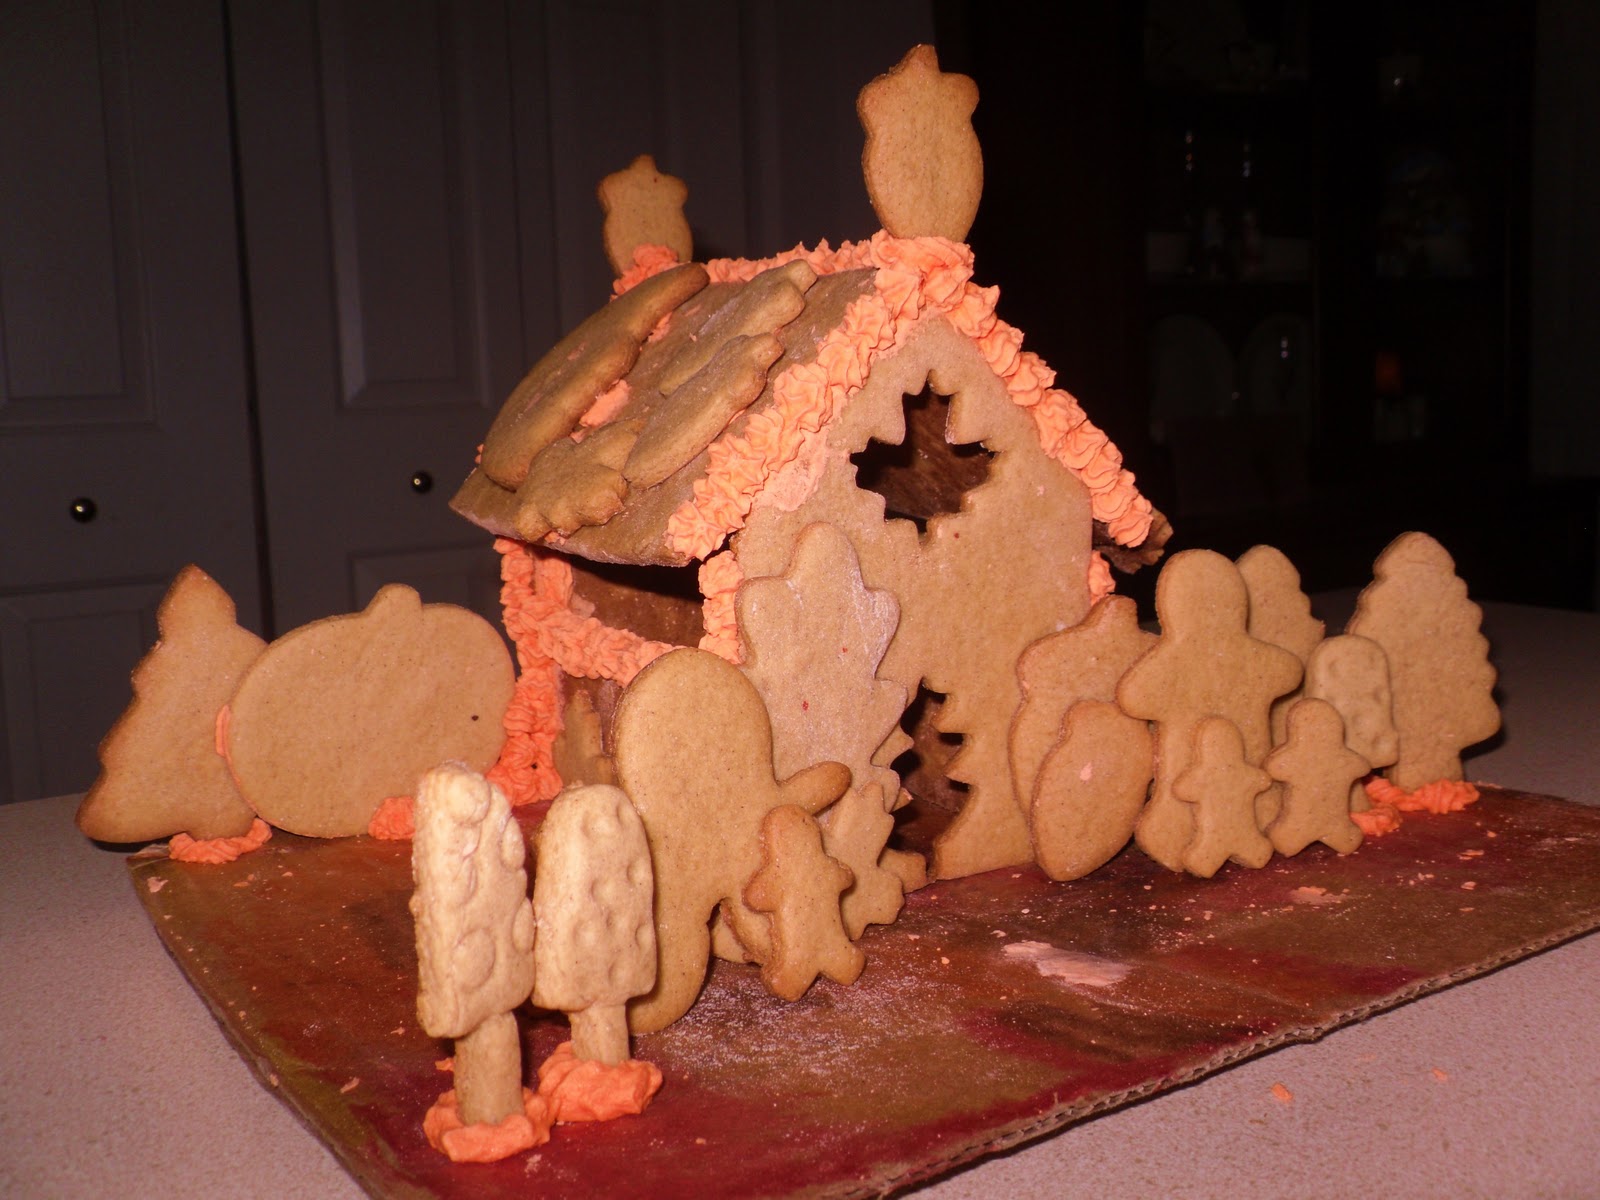
Next use the remaining dough to cut out the accent pieces...having fall themed cookie cutters really helps out with this:)


Bake the accent pieces on an ungreased cookie sheet 8-11 minutes until the edges are lightly brown.  Let all the cookie pieces cool and harden for 24 hours before beginning house construction.  To construct the house first select a base; we used watercolored cardboard but really anything sturdy will do.  Next mix up the house cement...AKA Royal Icing.  I used Alton's recipe and it was perfect.  I did add food color to achieve this awesome orange color:)  Place the icing in a pastry bag and prepare for piping!  Liberally pipe the icing on the back sides of the front house piece and attach a wall segment to each side.  Let this harden and then attach the back house piece using the same technique.  Let this set for at least 20 minutes before attaching the roof.  Next liberally pipe each house peak with icing and carefully attach the roof pieces.  Let house sit for at least 1 hour before attaching the remaining decorations. 

After 1 hour, I filled two pastry bags with the remaining frosting and let the kids go wild piping and decorating their houses.  These are the end results.


Happy Fall everyone...now go make a house:)

Friday, September 3, 2010

Craft Hope....Pillowcase Project.


Today I started sewing my pillowcases for Craft Hope project #9.  Craft Hope is a love inspired project designed to share handmade crafts with those who need them. It is their hope to combine their love for crafting and desire to help others into projects that make a difference around the world.  In support of pediatric cancer month Craft Hope is teaming up with ConKerr Caner to make pillowcases for terminally ill children. ConKerr Cancer was established two years ago to put smiles upon the faces of terminally ill children in the hospital. They provide bright and cheery handmade pillowcases for these children. They have succeeded in delivering 225,000 pillowcases up to this date. They have a goal of providing a beautiful pillowcase for every seriously ill child in North America by 2012.  Here is the pattern ConKerr Cancer provides for making the pillowcase. Please feel free to use whatever pattern you’d like, but make it for a standard size pillow. This page provides a regional directory of hospitals and coordinators for ConKerr.   Please direct questions and mail pillowcases to the coordinator in your area. Please do not mail the pillowcases directly to the hospital.   The deadline for this project is September 15th. So get to sewing and spread the seeds of hope one stitch at a time.

Monday, August 16, 2010

Candle Crafting

For O's 4th birthday I bought her a wonderful beeswax candle craft kit from Magic Cabin. We decide that today was a great day to try our hand at candle making. The kit is designed for children 5+ but she had no problem doing this craft independently. This was an easy and highly gratifying craft. The children marveled out their handiwork and I enjoyed the simplicity of it all. The smell alone was worth it. We made both tapered and pillar candles and embellished them with designs cut with cookie cutters. We used our candles this evening and had ice cream sundaes by candlelight. We have many sheets of beeswax left and will definitely be making more candles in the near future...I'm thinking these would make excellent Christmas presents. The kit makes 12 pillar candles or 24 tapered candles, of course if you want to make smaller candles the numbers are flexible.


Thursday, August 12, 2010

The Forest Fairy Queen

Yesterday O was really pestering me to come up with a pipe cleaner craft.  I was in a hurry, and in the middle of my weekly baking.  I could not stop to accommodate her.  So I dug deep into my frazzled brain and came up with this simple leaf crown craft.  I sent her into the backyard to collect leaves and returned to my cakes. When she reappeared I quickly punched two holes at the bottom of each leaf and had her string them onto a pipe cleaner of her choice.  Once she had filled the whole pipe cleaner up I twisted the ends together and VIOLA instant Fairy Queen!

Thursday, July 22, 2010

Let the Good Times Roll

We ventured into the world of  marble painting today, I thought it would be a nearly mess free painting experience......I was very mistaken!  Don't get me wrong I LOVE a good mess but today I was up to my eyeballs in scone dough and trying to provide some independent crafting for the masses.  The basic premise is to place a piece of paper in a box top, and roll paint covered marbles around in it.  Seems simple enough right? Well, within moments we had paint covered marbles flying through the air and beautifully marbled kitchen floors:) Things did not go as planned (do the ever?), end results were a dozen burnt scones, one paint covered kitchen, and some beautiful art.  On the bright side the activity was a big hit for the children, my "I don't do art boy" even had a blast...must have been the marbles:) T's usual response to arts and crafts is "I do art mom...Lego art!".  * Note to self please reserve marble painting for afternoons with plenty of time and a lot of paper towels:)

Monday, July 19, 2010

Yesterday we made balancing butterflies.  This projected was featured on Childhood Magic and it is quite a magical activity to do with children.  First I made a symmetrical butterfly template by folding a piece of paper in half and cutting out my design.  Then I traced the design onto watercolor paper and the children painted them.  To make the butterflies float you must evenly apply pennies to the underside of each top wing.  We used tape...I am not good with super glue:)


Once secure the butterflies will magically float!  We had a blast with these butterflies!  The children walked around all day with them balanced on their noses, heads, shoulders, and toes:)  I must say I equally enjoyed the whimsical quality of these creatures....(she types as a butterfly alights her shoulder).


Friday, July 16, 2010

Going Nutty...

The boredom bug hit hard at my house yesterday. To combat this elusive and cantankerous creature I had to pull out all the stops.  We finally settled on painting but after I had set up the table I realized....we had NO paper.  So I had the children forage outside for things to paint.  The children found these awesome nuts shells under our Beech tree.  They were able to craft the cutest hedgehogs, butterflies and turtles out of them....with a little help from mom:)  We also studied the Beech trees bark, leaves, and  fruit after we read about it in our Peterson's First Guide to Trees


Paper who neeed its......

Saturday, July 3, 2010

Easy Garden Craft


We made very easy and cute garden signs yesterday using foraged birch bark and glass beads.  While on vacation last week the children and I collected various barks and branches from the local flora.  To make the above garden sign we punched holes in the bark with a standard hole punch.  I used a sharpie to decorate the bark with O's name and a meandering vine design.  Next I had O string glass beads onto a piece of wool yarn.  We then threaded the yarn through the holes and tied off each end.  Viola! The sign looks so beautiful hanging in the lush green gardens.


Here is a gratuitous shot of our flourishing vegetable gardens.  The children and I are fully enjoying this venture, and the results speak for themself!


Saturday, June 5, 2010

Flower Power


O and I painted with flower blossoms today. The garden is bursting with beautiful spring flowers and we had a wide array to choose from. O decided to use clover, pincushion and dandelion flowers. The results were amazing! We stayed with a simple color palette of primary colors. O is learning about color theory and this activity was a great way of incorporating nature study and art! You have to love interdisciplinary preschool studies!

Sunday, April 18, 2010

In a Galaxy Far Far Away....A Stars Wars Birthday Party

Yesterday was T's 7th birthday. To celebrate we threw the Star Wars party of the century. The house was filled with fellow padawans hoping to complete their Jedi training. My husband led them in training and then awarded them their lightsabers. Once armed they helped defeat the Darth Vadar piñata and destroy the Death Star. After all this annihilation the young Jedi's feasted on lightsaber cake and bestowed T with his gifts.


I upcycled an old box to create the Death Star toss.

The piñata was fashioned from a paper mached balloon and painted using this design.
The lightsabeer cake was easily constructed by cutting a 13x9 sheet cake into 4 equal slices and tapering one of the slices.  I wanted to use rolled fondant but went with flavor over aesthetics...what doesn't taste good swathed in cream cheese frosting?
I think T's face was plastered with a smile ALL.DAY.LONG.  I must admit I was pretty geeked out by the whole Star Wars theme as well.   I can not believe I am the mother of a SEVEN year old!  Thank you T for sharing with me the joy of motherhood.  These past seven years have been the most beautiful, adventurous and hilarious years of my life. 

Monday, April 12, 2010

Life. On Mondays: Unfolding

Stephanie from Ordinary Life Magic (Too.) is Unfolding. Here is our artwork unfolding.

Unfolding

This tie dye craft was inspired by Wendolonia.